Thursday, August 23, 2012

Decorating a Lampshade

I've been looking for some simple ways to personalize Micah's bedroom that wouldn't add too much to my already over-flowing plate. When I looked for a cute monkey lampshade, I was amazed at how expensive and ugly they were. So, a simple solution was to make my own!


My mom bought fabric to make curtains for his room, and she just so happen to have an extra yard for me to use for this project. I started with a very basic (and bland) lampshade.


I then took some wrapping paper to draw out a pattern for this particular lampshade. I carefully moved it along the paper, tracing with a felt marker, since the mechanical pencil I found kept ripping through the paper. I'm sure if I was doing this on a table, the pencil would have been cleaner.

After I traced the lampshade, I cut it out and made sure that it fit around the lampshade. I didn't want to waste any of the fabric, so I wanted to make sure it was going to work before I did anything rash.


Now, in order to make sure that the fabric fit over the edges, I was going to have to add an inch the whole way around this pattern. I did this a very unscientific way. When I laid the pattern on the (wrong side of the) fabric, I used my bent finger to give me an estimate of an inch, and I put a dot on the fabric. I marked any of the turns/corners with an X and connected all of the lines. One challenging part was at the corners, since I had to go an inch down and out in order to keep the same shape. I could have used a ruler, and it would have been far more accurate, but I was too lazy to find a ruler and didn't want to use the yard stick.

I was fairly confident that this new pattern would work out, and I started cutting the fabric. Once it was cut out, I wanted to make sure it would sort of fit, and it worked out perfectly. I also noticed at this time how wrinkled my fabric was. I decided to bite the bullet and actually iron it. I wasn't going to go through this much trouble to have it end up wrinkly.

As suggested from another blog, I started working at the seam in the original lampshade. I secured it down the side with tacky glue and folded up the bottom edge under the shade. I ran into my first problem with the prongs on the top of the shade.

I pushed the fabric against the post so that I could see where the fabric needed cut, and I cut a small mark at that point. I also had to do the same thing on the corners of the top of the shade in order for them to lay flat.

I got all the way around and folded the last part of the fabric so that it lined up with the edge of the shade.

I wanted a really clean line, so I decided to go back to the iron to get this fold. It still worked, since I hadn't attached the bottom or top of the panel yet (as shown in the picture above).
I had already ironed it before where I thought it would need folded when I started the project, so now I just folded over a little more. Funny story: the iron was out of water when I started this project. So I refilled it when I ironed out the whole piece of fabric. When I went to iron this little part, the excess water leaked everywhere. No big deal? Right? Nope. Remember that blue marker that I used because it was easier than a pencil? It ended up bleeding through the various layers.


I thought about not caring, but the rest of the project looked so good that I didn't want this to ruin it. I found a Shout wipe and managed to get the blue out. I glued the rest of the edges down, and I was done... or so I thought.

I don't know if you can see, but the inside has very messy edges. That didn't bother me a ton until I took it into his bedroom and put the light into the shade.

I could clearly see the edges through the shade when the light was one, and it bothered me. Again, I had spent too much time to do a poor job, so I went back for further adjustments. Since the glue was still mostly wet, I was able to pull off one edge at a time, and fold it over itself. The fold lined up with the original shade's fold, and it had such a cleaner look!

Once I put the light back on, it looked great!


And that's Micah's new lampshade, made at no cost to me (thanks Mom), but would have been a fairly inexpensive project if I had actually shopped for the fabric. I think I used about half of the yard.

Thursday, August 9, 2012

Monkeying Around

Since we got all of Micah's furniture in his room, we were ready to add his wall decals. I ordered some WallPops! on Zulily for Micah's room before we even purchased the house. Thank God they ended up working with the colors that we used.

The sets we got were Monkeying Around and Jungle Friends Growth Chart, and we set it up slightly different in Micah's room. I think it turned out great!


The growth chart was more challenging than I would like to admit. They give you 4" of trim below the decal, but our trim is almost 8". I cut off the excess 4" and marked where 52" was on the wall (that's how high the decal is supposed to go to). I measured everything once, drew a light line on the wall, and even used a level to make sure everything looked as good as possible. There was a slight angle to the edge, but only noticeable if you were looking for it. Once I sat down to calm Micah back down, I took a deeper look at a further distance to notice that it didn't seem right. Micah last measured at 25.5", so he should stand right around the 2' line, right? When he stood against the chart, he didn't come close to 2'. Obviously, measuring once was not adequate even for this trivial responsibility. After a second measure and moving the decal down, it is now a lot closer to being an accurate measure of height. It's still not perfectly level, but the difference is .25" from the very top to the very bottom. That's something I can live with.

We're getting closer to finishing Micah's room! It's so exciting!

Monday, August 6, 2012

Valuable Lessons

There are so many hilarious lessons that we've been learning through this whole process. Most people with any amount of common sense would have already figured them out, but on our sleep deprived, over-worked brains, we've lost a lot of common sense.

1. There is NO good time to paint the color brown. At night, you can't see what is a shadow and what is painted. During the day, you can't tell what is painted and what is a reflection of the light in the room. Regardless of the time of day you paint brown, you WILL have to go back and touch it up. I also recommend noting the spots that you want to get to when you have the paint back out, because your eyes will deceive you once that paint brush is in your hands.

Black however did not have these same problems. Odd.

2. While it may not look this way at first, the vent covers ARE universally installed. Before installing the 2 covers that were done, I decided to spray paint the third one black to match the new color palette in the spare room. While letting that dry, I started installing the other vent covers only to realize they don't fit the rooms they were painted for. Of course, the cover will fit on the wall, but the door won't open and close accurately. I felt nauseous and incredibly stupid.


I got the vent cover on, but the door was stuck open. I couldn't get it to close all of the way and was convinced something was wrong. I tried Micah's and had the same problem. Ugh.


Once I tried the same plate in all 3 rooms and realized they ALL had the same problem, I began to regain hope that I didn't screw up painting the covers. Jason tried installing them and held back a laugh when they all fit perfectly. I guess it's supposed to look like this. The little lip on the bottom of the plate rests on the lip inside the wall that I thought it was getting "stuck" on. Nope.

We did find out though that at some point two of the vents became too loose, so as soon as the air kicked on, it would slam shut. Micah's was fine, but the other two (that share the same vent) weren't getting air into the room. We found that if we tightened the screw just below the handle, it made it stay open when the air came on. That might explain though why the bedroom was ridiculously hot once we put the vent cover back on. Oops!

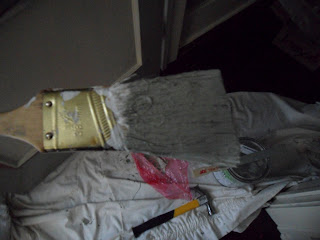
3. Paint brushes. I was always told never to get a cheap paint brush, but I had no business even caring about that information until I had to paint something other than my toenails. It is true. And now I know.

I'm not the best wall trimmer in the world, but I'm pretty sure Micah could have cut this ceiling better if he had a better paint brush.


It doesn't look absolutely terrible, but you can already see where some of the rogue bristles have already been trimmed away. At least the damage was only done in the closet.

4. Don't install door stops in the dark or assume the obvious.

The picture gives it more credit than it deserves. The wood at entry point is cracked, and the stop won't go in the whole way because it was done by hand. It does stop the door knob from hitting the wall though....